My nephew’s birthday is fast approaching and I decided to give the little guy his first real computer. But of course it’s me, and I cannot just get him some kind of standard off-the-shelf straight from Best Buy kind of system. Its just not in my idiom. So I asked him what kinds of things does he like? Does he have any favorite animals? What are his favorite toys. His response? Motorcycles. And cars. Also Trucks. But mostly motorcycles. Actually anything with a motor. Believe it or not, that was all I needed to be armed with proper knowledge to try and build a custom themed build.
Im going to call it the MotoMadness Build.
My design requirements were pretty simple. Build him a machine that at least thematically looked like a motorcycle or something that would look cool on a truck or car. Or at least as cool and as close as I could get. Something that no other kid in the area would likely have and have it truly and uniquely designed around him.
It did not have to be a giant massive gaming rig – all tricked out with the latest and greatest graphics adapters, and such as he is still not beyond kid videos on Youtube and basic children games. But I did want it to be expandable for him to grow with him and his potential use in the future. The idea was to ensure that it was easily upgrade-able.
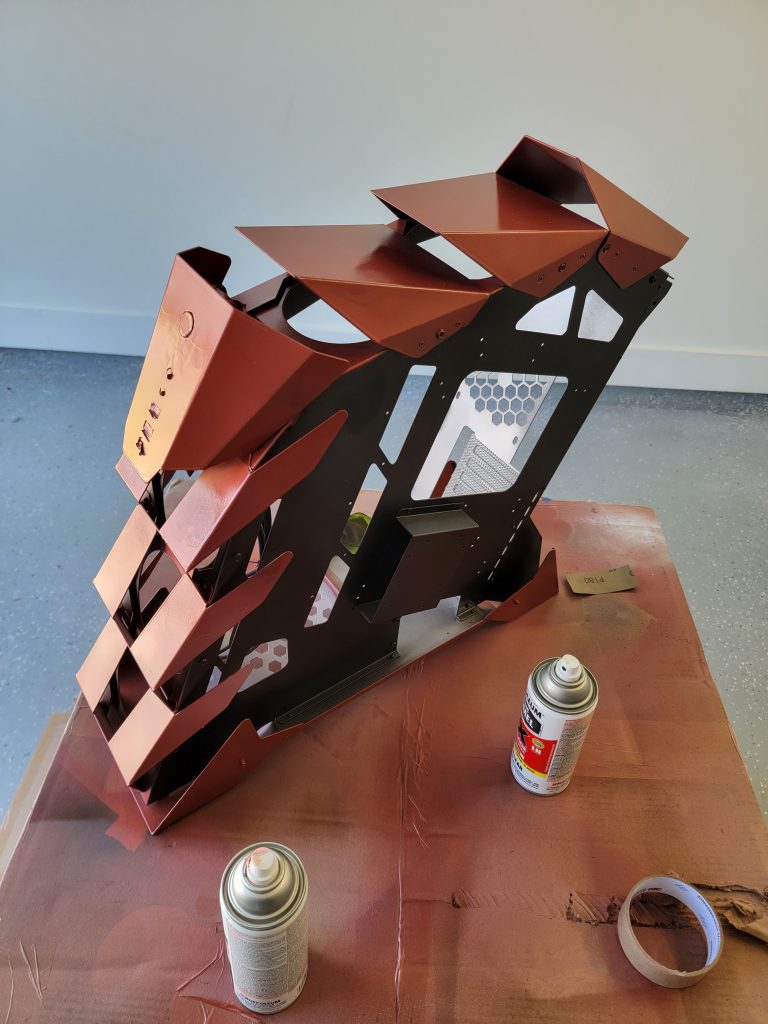
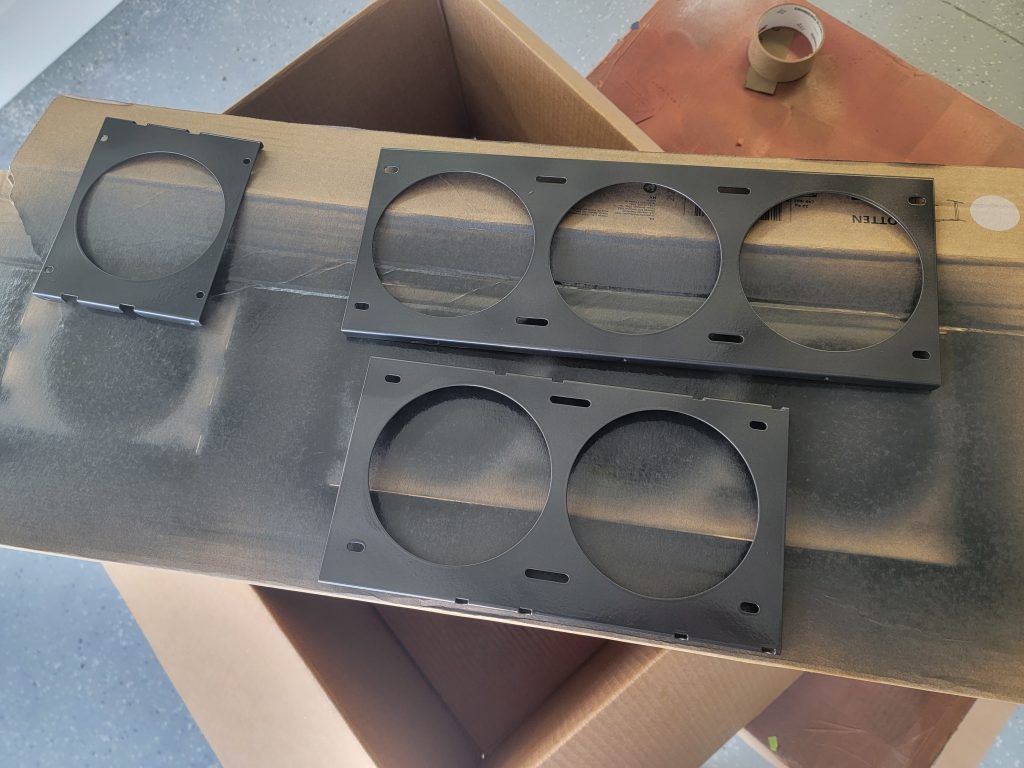
For the case I went with the Mid Tower, ATX Ventroo Pangolin as it definitely had a cool ‘Moto’ feel to it. Especially as I took the case apart and did some custom painting and enameling on it. The exterior look would comprise of a shiny Red Chrome Primary color, With Black and Silver Chrome secondary colors. The case has a fair amount of de-composable components to really give you a lot of painting options and the open ‘wings’ allow you to do some neat shadowing work.
The case had quite a few ‘natural’ imperfections which made painting it somewhat challenging. Lots of sanding, priming, re-sanding, and I still didnt get them all out. But in the end I liked the way it came out. Functionally the case had some challenges as I would discover later, but I was able to find a way to make it work.
I went with an MSI MPG X570 Gaming Plus Motherboard with an AMD Ryzen 5 5600X (6 Core, 12 thread) CPU. I installed 32GB of Kingston Fury Renegade DDR4 3200Mhz memory and installed a 1TB Western Digital Black NVME Drive.
I opted not to do a water-cooled build, first because of the added complexity is a little beyond what the little guy and my sibling would want to deal with. But also because I know that at this point it wont be used for driving very significant heat loads based on usage. The case itself has plenty of opportunities for air-cooling and I loaded it up with Seven (7) RGB Corsair SP120 Elite 120mm fans. This baby will glow like a radioactive nuclear core. I also had the benefit of having a bunch of these laying around my workshop as my primary Windows machine is a Corsair/EKWB build in a Corsair 1000D case. While that is a water-cooled rig, I had initially loaded up with Corsair fans. That included a couple of spare RGB hubs which would definitely be needed for this build. Again, this build will likely not generate a ton of heat, but we are going for cool factor. Or at least what a kid would think is cool.
Given the global supply chain issues around graphics cards and likely use cases he will see, I went with an overclocked Gigabyte AMD Radeon RX 6500 XT Graphics card.
The motherboard I selected did not have an onboard WIFI capability and I know that a directly attached machine will not be an option at my nephews home. I had gotten a some good feedback on Fenvi Wifi 6E PCI Card so I grabbed one of those as well.
For the last real required component I had gotten a ROG (Republic of Gamers) Thor 850W Platinum Power Supply. If one closely pays attention to the list of kit I have assembled here they would see that all of the components follow my color design requirements of Red, Black and Silver Chrome.
I had intended to do a single post about this build but the forces of the universe were against me and of course it got derailed. Some of the challenges I was able to overcome, but others required some additional items to make this work. More on that in a minute.
My usual process in building these custom machines is to concentrate on the case and basic components first. This usually takes the longest time in the process as the sanding, priming, painting, enamel work just requires wait times. I then move on to build-out the motherboard and its core components (CPU, memory, NVME) but not the adapter cards. I then install the motherboard in the case, install graphics card, in this case the additional WIFI card, and whatever else. My last step is to fully wire the whole thing up.
This includes connecting the case front panel, internal power cords, fan and RGB connections, internal USB connections and the like. I dont tidy my wires at this point, I just make sure everything is connected in the right way. This allows me to have my ‘big moment’ of throwing the power switch on the power supply and await for things to start spinning, or gurgling, and lighting up.
For this build, I got all of that accomplished, threw my switch – and…. nothing. After some initial troubleshooting I realized that the power supply was Dead on Arrival. Ugh. No way to work around that. I dont have a spare Power Supply, so I ordered a new one. Same brand. Same type. So hopefully I will have a better result the second time around. We will see. So now I am stuck waiting on parts. Obviously the power supply, but I also ended up having to order some fan splitters. The motherboard is generous with 4 different fan leads, but that is just not enough for a seven fan case. So I also ordered some fan splitters that will allow me to cover the power requirements for the extra fans.
But I am bummed about not moving to the next stage which would include the BIOS, Operating System load, loading the drivers, and then on to my 24 hour burn-in. The last stage is final paint touch-ups where needed, and then waxing it up into a nice shine for delivery.
I know I mentioned some issues with the case, so I thought I would cover some of the more interesting challenges there. The case itself is cool and has a great angle or lean to it which gives it that more ‘sporty’ look. Unfortunately, it also means that installation of a power supply proves to be a little tricky. It doesnt fit in the traditional pre-cut holes and the actual braces for it are mid-case. To make matters worse, the mounting bracket would be opposite of what I would have expected.
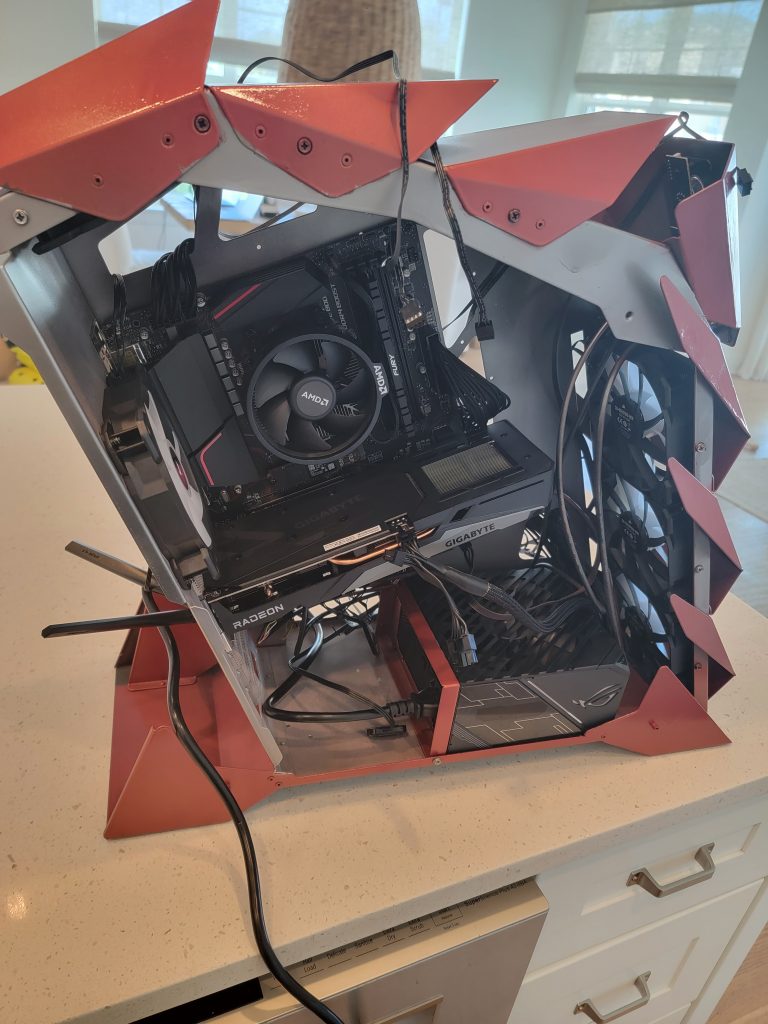
You can see the bracket and power supply on the picture to the right. Not sure I’m a huge fan of routing the power cord through the case. So I am still playing around with options there. Having the on/off switch inside the case is not optimal. I guess I could try a smaller power supply that would fit in the small space where it should be.
I am also targeting to see if I can get Windows 11 on this machine. I have seen so many machines ‘Not Qualify’ for minimum Windows 11 installation that I am curious if this will make the alleged grade. I will likely cover my experience with that once I get the new parts.
Until then its a waiting game until the kit arrives. Not sure if folks find this interesting or not. Al ot of this is me just documenting the work in the hopes that one day in the future my nephew may catch this technology bug too! 🙂
/Mm
Hi Mike,
It sounds like a really fun project! I built a couple of my own computers back in the late 1990s. As you know, a superior system to stock Dell, Compaq, HP, Gateway or____ even…E Machines(LOL) desktops available at the time could be put together for less with a trip to MicroCenter. I was amazed at how simply the motherboard, ram sockets, power supply and other components plugged into one another. The biggest challenge for me was loading the software and figuring out how to configure everything. I stopped building my own systems when the savings wasn’t worth spending my time. Technology leapt forward so fast that finding a off the shelf desktop capable of everything I needed was a great value. -Dale